In this tutorial, we go over what to do if you run into issues while playing neem. We also cover steps to take when when contacting our support team regarding issues or bugs you may find while playing neem.
System Requirements
Please check out the system requirements for neem here. Please note that we do not guarantee or provide support for use of neem outside the recommended specifications.
Troubleshooting
Below are some examples of problems that may occur when using neem and how to fix them.
Camera and Mic Trouble (Chat and Live Streaming)
The following are some solutions to issues that may arise when using a camera and mic.
- Icons do not appear and I can’t start or mute during voice chat.
- The camera feed is not displayed while live streaming or video chatting.
Camera and Mic Permission Settings
If the permission settings to use a camera or mic are disabled for neem Browser, some features may not be available or may not work properly. In this case, you can resolve the issue by changing the permission settings.
Note: When you start up neem Browser, a dialog box asking for permission to use your camera and mic may appear.
For Windows Users
The examples in this tutorial are made using Windows 10.
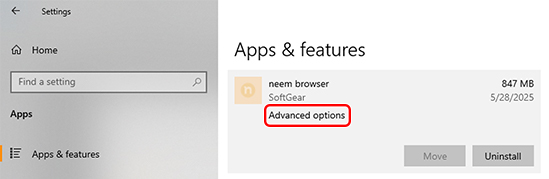
First, start by checking the neem Browser settings. Click the Windows icon, Settings and select Apps. Look for neem Browser and open its Advanced options.
Under App permissions, set the devices to On.
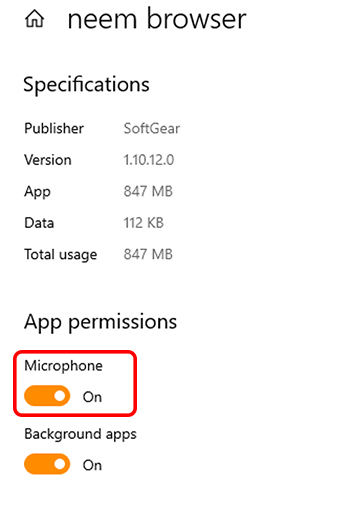
This is a possibility that these settings may be disabled for the camera and mic settings themselves.
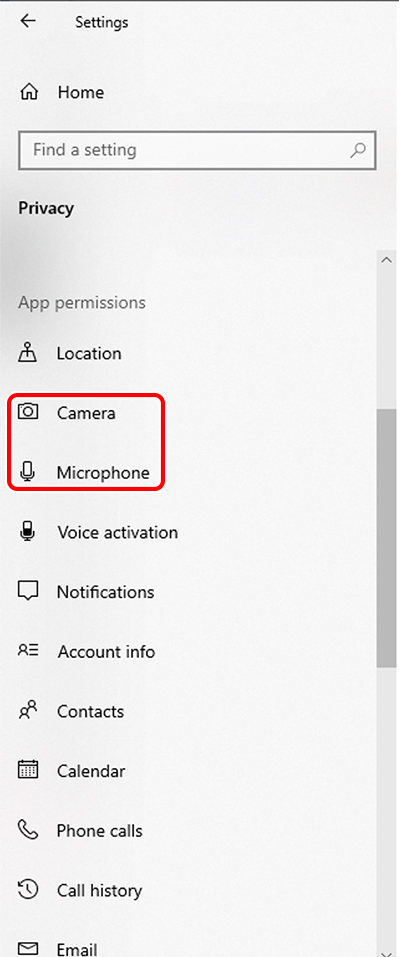
In this case, click on the Windows icon, Settings, and select Privacy. Click on both Camera and Mic and turn on their access permission for apps.
For Smartphone and Tablet Users
Open the neem Browser settings and change the mic and camera permission settings.
The way in which permission settings can be set will vary depending on the device you are using. For detailed instructions, please refer to the official support page or manual for your device, or try searching for your device’s model name or words such as permission settings online.
Reinstalling neem Browser
If you ever decide to contact our support team regarding neem Browser, they may ask that you try reinstalling it. The steps to reinstall the neem Browser are written below.
Note: The steps for this guide were written while using Google Chrome in Windows 10.
Uninstalling neem Browser
First, we need to uninstall neem Browser.
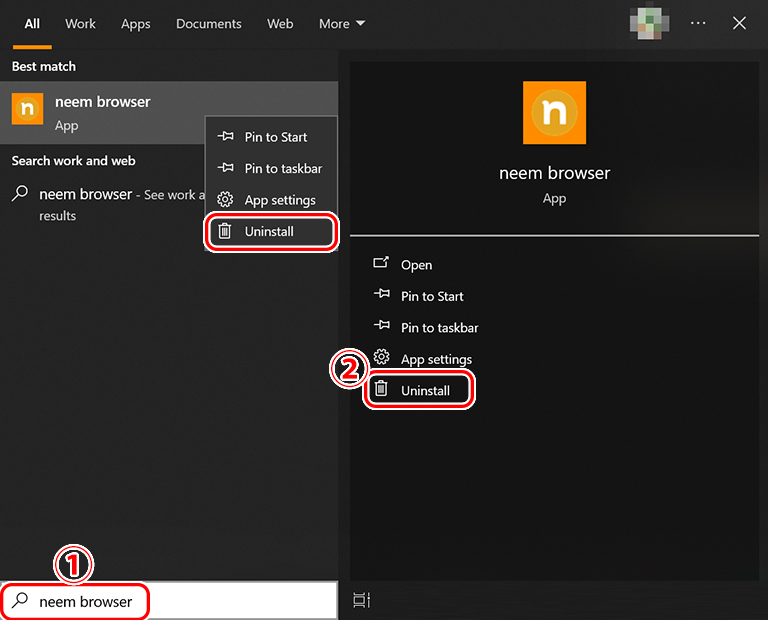
- In the taskbar search box, search for neem browser.
Note: Windows + S is the shortcut to bring up the search bar. - From the menu that displays, click on Uninstall. You can also right click the app from the results list and click Uninstall from there.
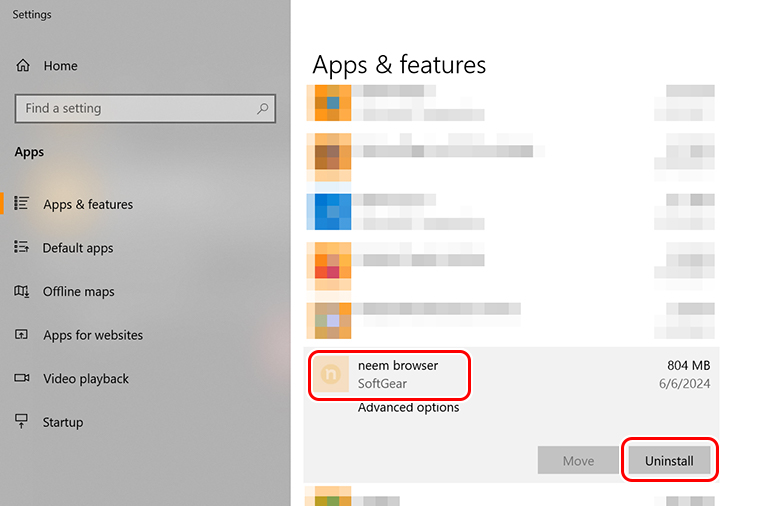
neem Browser can also be uninstalled from the Apps & features settings.
Installing neem Browser
With neem Browser now uninstalled, let’s reinstall it.
Downloading the Installer
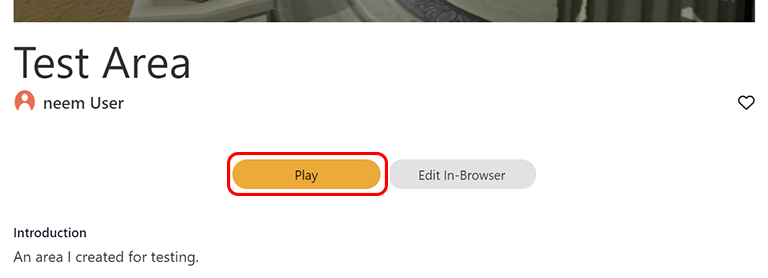
First, select any area to bring up its page. Then click on the Play button.
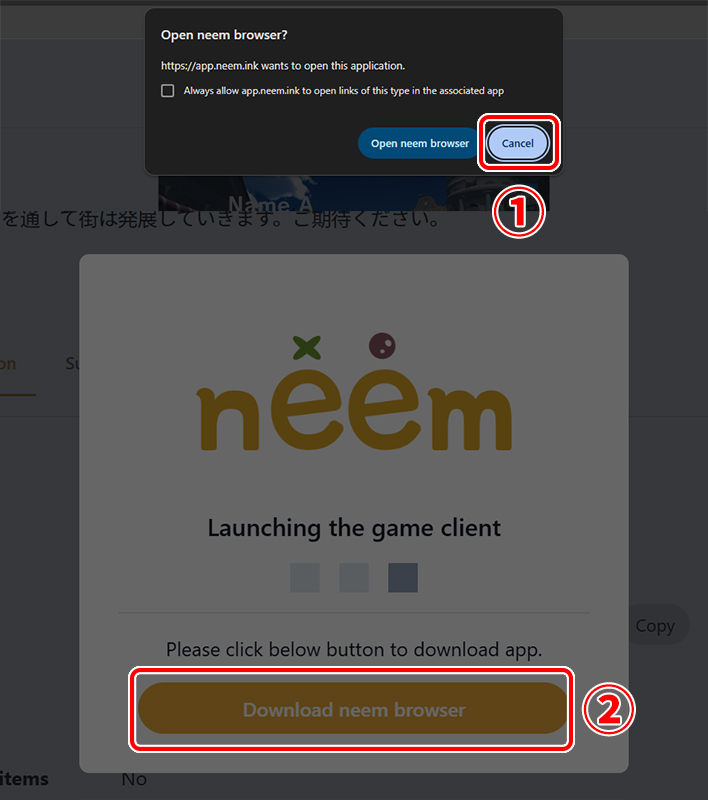
- A dialog will appear asking us if we want to start up neem Browser. Click on Cancel to close it.
Note: This dialog will only appear if the checkbox next to Always allow app.neem.ink to open links in the associated app has not been checked. - In the other dialog that appears, click on Download neem Browser. This will begin downloading the installer.
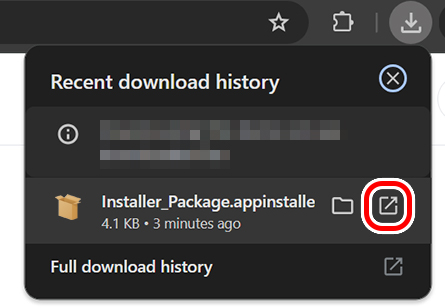
Once downloaded, let’s open the installer.
Running the Installer
(As of November 1st, 2024) A warning may be displayed on the Windows version of neem Browser. Please rest assured that this does not have anything to do with the safety of neem browser. (For more information, click here)
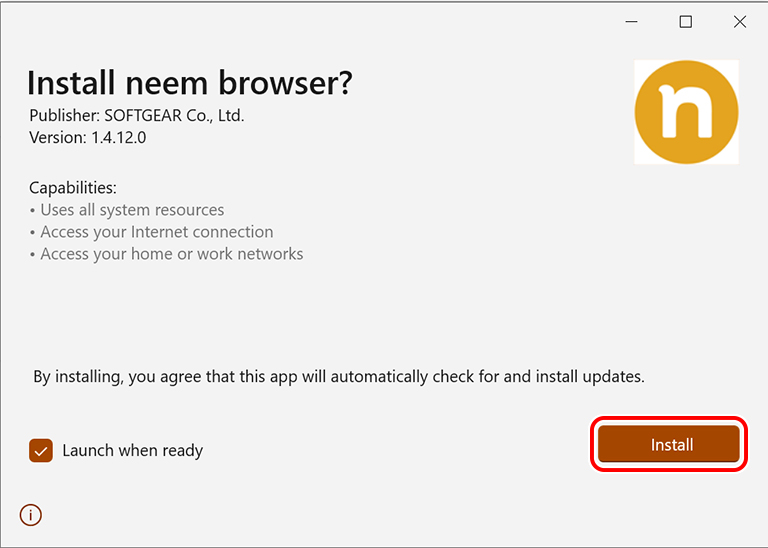
Once the installer opens, click on Install to begin the installation.
And with that, neem Browser has been reinstalled.
Try entering an area by clicking on Play again.
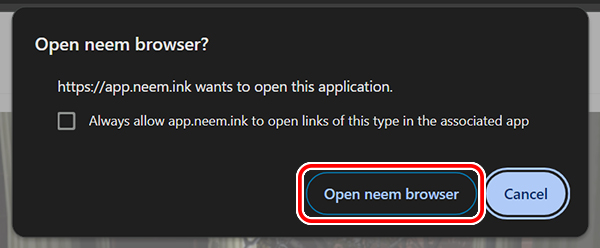
If the dialog we closed earlier appears again, click on Open neem Browser to open neem Browser.
When an Issue Cannot be Resolved
If you are unable to solve an issue you run into, please contact us via our contact us page.
About the neem Browser Log Files
If you need to contact our support team regarding a bug you’ve found, we may ask that you send us the log files generated by neem Browser. These log files contains a historical record of processes, errors and other data that occur within neem Browser.
How to Find the Log Files
Note: The following example was conducted using Windows 10.
Follow the instructions below show you where to find the log files.
- Log files directory path
C:Users /{USER_NAME}/AppData/LocalLow/Soft Gear Co, Ltd/neem browser
- Open File Explorer
- Click on PC > Local Disk (C:)
- Click on Users
- Click on your Username
Note: The name here will differ from user to user. - Click on AppData
- Click on LocalLow
- Click on Soft Gear Co, Ltd
- Click on neem browser
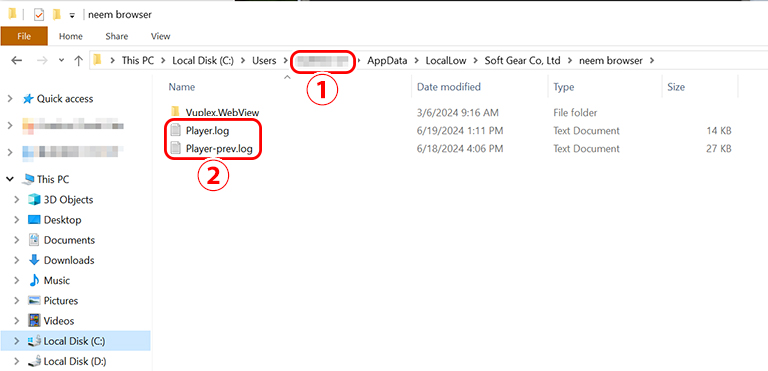
- This is where the username for the profile logged into is displayed
- These are the log files
- Player.log
- Player-prev.log
If asked or if you are contacting us about a bug, be sure to send us both the Player.log and Player-prev.log files.
How to Find the Hidden Folder AppData
The AppData folder may be hidden. If so, you won’t be able to find it under the username folder. Follow the instruction written in the following support page to be able to view hidden folders.
Microsoft Support – View hidden files and folders in Windows
How to Get Your PC’s Full Specifications
If you need to contact our support team regarding a bug you’ve found, we may ask that you send us your PC specifications such as CPU, graphics card, etc.
How to Generate a DxDiag.txt File Using the DirectX Diagnostics Tool
Note: The following example was conducted using Windows 10.
Below, we cover how to use the DirectX Diagnostics Tool. Using this tool, you will be able to generate a text file that contains your PC’s specifications.
How to Open the DirectX Diagnostics Tool
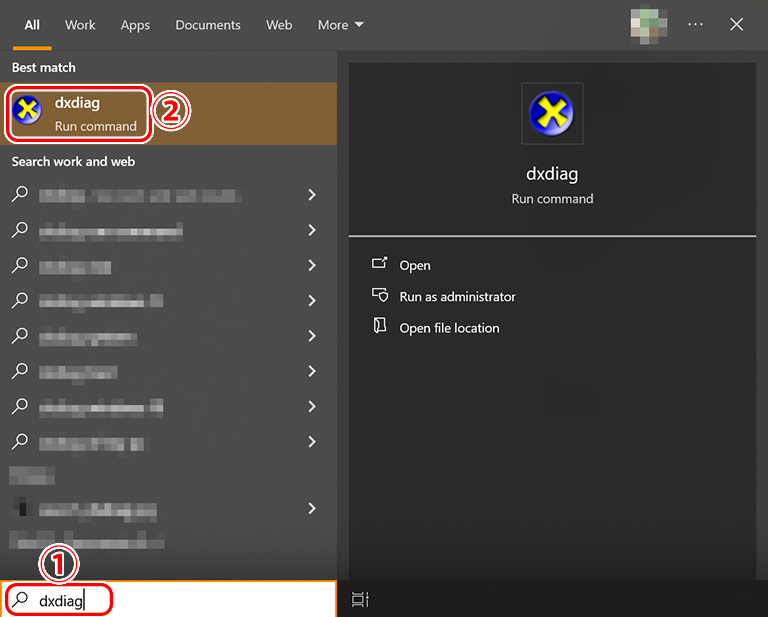
- In the taskbar search box, search for dxdiag.
Note: Windows + S is the shortcut to bring up the search bar. - From the search results, click on either Run command or Open.
This will open the DirectX Diagnostics tool.
How to Save Your System’s Information
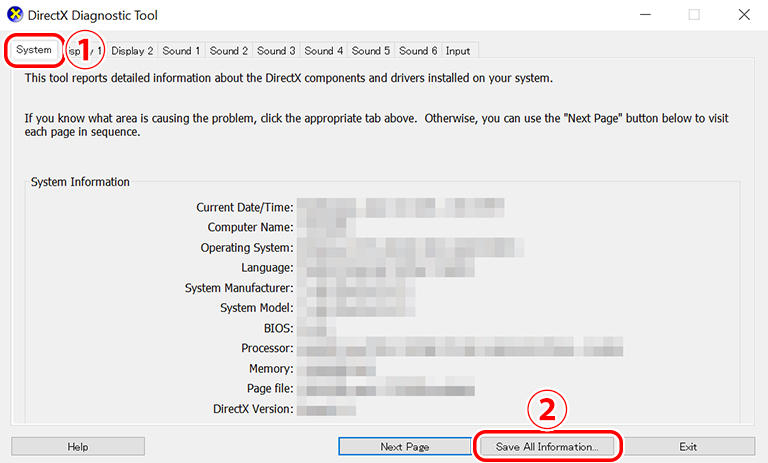
- With the DirectX Diagnostics Tool open, make sure the System tab is selected.
- Click on the Save all information button at the bottom right. This will export your PC specs to a text file.
Next, select a location to save the file.
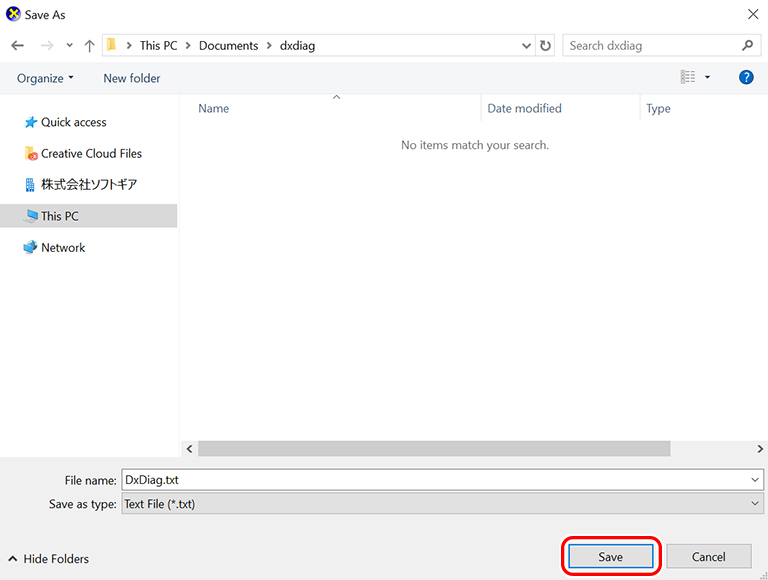
A Save As dialog box will appear. Save the file to wherever you’d like. After doing so and clicking Save, a file named DxDiag.txt will be created.
Open the location where you saved the file and send it to our support team if asked for it or when contacting us about a bug.