In this tutorial, we go over the Map Editor’s viewport. Details on how to use the various Map Editor tools will be explained in another tutorial.
Left-Side Menu
Below, we go over the buttons in the menu on the left side of the Map Editor screen.

- My Areas
Closes the editor and returns you to your My Areas page. A dialog with the options to Save or Return (No Save) will appear. - Play
Saves the changes you’ve made and opens the area in the neem Browser. - Save
Saves the changes you’ve made to the map. - Settings
Brings up the settings menu. Updates to these settings will not affect the area you are currently editing. - Help
Displays the help screen.
Camera (Viewpoint) Movement
The explanations below go over how to use the camera (viewpoint). Depending on whether you are editing in 2D or 3D, the camera movement will differ slightly.
- Mouse: click-hold and drag with right button
Rotates the camera around the center of the screen. - Mouse: click-hold and drag with scroll wheel
Moves the camera. - Mouse: scroll wheel
Zooms the camera in and out. - Keyboard: W, A, S, D
Another way to move the camera.
You can move around similar to how you move when controlling an avatar. - Keyboard: Q, E
Rotates the camera 90 degrees.
Tools Menu
Below are explanations on how to use the tools in the tools menu at the bottom of the screen.
- Some tools use a brush.
To learn more, check out the Brush section. - Some tools can be used to position objects.
To learn more, check out the Transforms section.
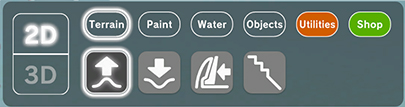
2D/3D View
Toggles how the terrain is displayed.
Note: Depending on the view, some tools work differently.
Terrain
- Raise Terrain
Raises the terrain in the direction of the camera.- When in 3D view, since the terrain raises towards the camera, you’ll be able to can create things such as arches and caves.
- Note: When in 2D view, raising the terrain also fills in the cavities underneath where it is risen.
- Lower Terrain
Lowers the terrain in the direction of the camera.- When in 3D view, since the terrain lowers opposite the camera angle, you’ll be able to can create things like floating platforms.
- Flatten Terrain
Flattens the terrain based on the brushes location.- In addition to flattening the terrain, if used little by little, you can make beautifully sculpted slopes and angles.
- Smooth Terrain
Smooths out the terrain that falls under the brushes range.- This tool rounds out the shape of your terrain. Depending on how you plan to shape your terrain, it may be better to use the flatten tool.
Paint
- Textures
Paints the terrain with the texture selected. Select a texture from the Palette menu. If you are having trouble painting certain areas, try increasing the brush size and painting again.
Water
- Generate Water
Digs up the terrain in the vicinity of your brush and adds water. If water is not being added, try adding it using the Add Water tool. For best results, use the tool as if you are replacing terrain with water. - Add Water
Add water to places where the Generate Water tool was used. Since water is added on top of the terrain, it may not be added as intended. If water is not added as expected, try adding water again after adjusting the terrain some.
Tip: If too much water is added, remove it by raising the terrain. - Remove Water
Removes water. Removes water you’ve added to the terrain. If you are having trouble removing water, try removing it after raising or lowering the terrain a bit.
Tip: After removing water, don’t forget to raise the terrain back to where it was before.
Objects
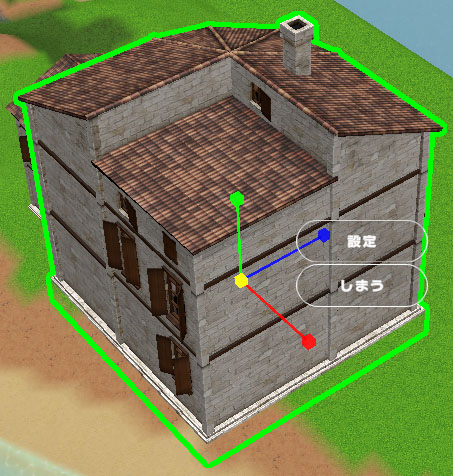
Objects that can placed within an area will appear in the Inventory window. Select an object you want to use and place it on the terrain. Clicking on a placed object will display its menu.
- Object Menu
- Settings
You can change settings such as an object’s position, rotation and size. You can also set objects to perform certain functions. - Put Away
Returns the object to your inventory.
- Settings
Utilities
- Invisible Walls
Press Create to add an invisible wall to your area. Invisible walls can be used to prevent players from doing things such as falling into water. Click on an invisible wall to display its menu. - Sound Presets
Change the BGM that plays in your area. - Environment
Change the time of day and the direction and color of the overall lighting. Add or remove fog and adjust its density. - Lights
Press Create to add a light to your area. You can adjust lights to fit the atmosphere of your area. Click on a light to display its menu. - Spawn Points
Press Create to add a spawn point to your area. Click on a spawn point to display its menu. - Notification
Creates a notification that displays when entering the area. You can set the link to be a website’s URL and the number of times the notification displays.
Shop
You can purchase objects to place around an area.
Brush
You can adjust the brush settings used by certain tools. You can switch which settings are displayed by clicking on Details in the bottom left of the menu.
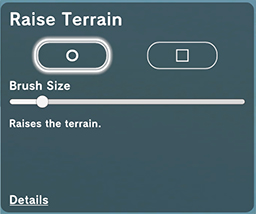
Basic Settings
- Brush Form
Choose either a round or square brush. - Brush Size
Change the size of the brush. If the terrain does not form well, try increasing the brush size a little.
Advanced Setting
- Brush Strength
Adjusts how quickly terrain raises or lowers. Set higher for quick adjustments and lower for fine adjustments. - Brush Smoothness
The degree to which terrain is smoothed together with surrounding terrain. If you are trying to make the surrounding topography and boundaries more distinct, try setting this lower.
Transforms
This section covers how to edit the transform of an object. Objects placed within an area such as those in your inventory, lights and more can have their transforms edited.
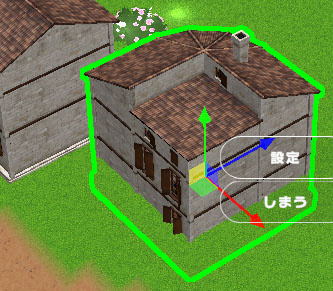
When clicking an object, the transform gizmo will display. The transform gizmo is a combination of red, blue, and green lines that appear on an object.
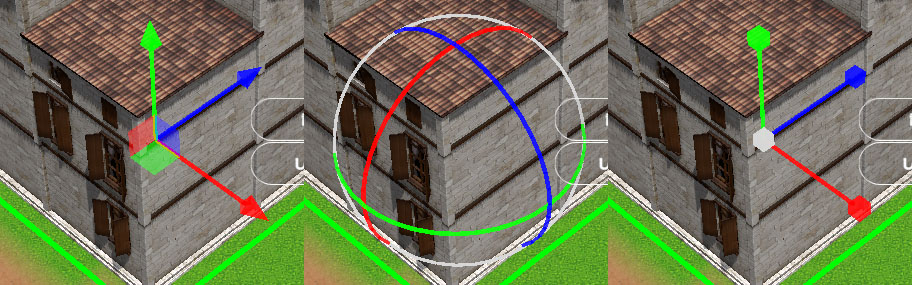
The transform tool being used can be changed using the menu at the top center of the screen.

- Move
- Rotate
- Scale
Move
By pressing and holding one of the gizmo axes, you can move an object. Objects can be moved along the selected axis by dragging the mouse.
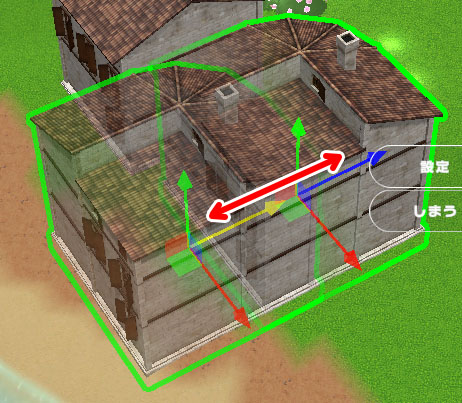
You can also move objects using the three squares in the middle. By using the squares, you’ll be able lock objects to certain planes and move along two axes at once.
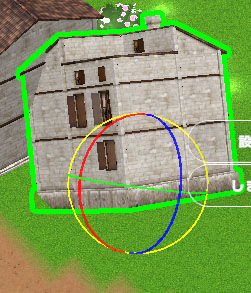
Rotation
By pressing and holding one of the three gizmo axes, you can rotate an object. Objects can be rotated along the selected axis by dragging the mouse.
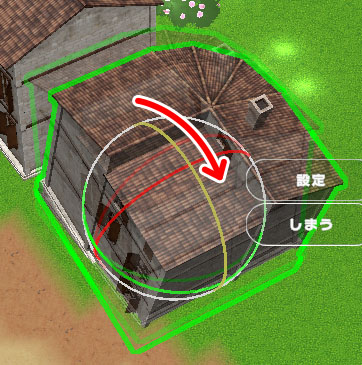
By selecting the white line, you will be able to freely rotate in any direction.
Scale
By pressing and holding one of the three gizmo axes, you can scale an object. Objects can be scaled up and down in the direction of the selected axis by dragging the mouse.

By selecting the white cube in the center, you will be able to scale an object up and down in its entirety.
To sum things up, we briefly introduced the Map Editor. In a future tutorial, we will go into more detail on how to use the tools covered in this tutorial. We will also give you ideas on how to create areas.
Have fun editing your map!